 Save to Pinterest
 There's something about baking a sheet cake that makes you feel like you're part of the celebration before the cake even leaves the kitchen. My neighbor knocked on my door one afternoon asking if I could help her daughter's class pull together something special for graduation day, and I realized right then that this simple vanilla cake would be the perfect canvas for all that pride and joy. The beauty of it isn't in complexity—it's in how forgiving it is, how it comes together in less than two hours, and how those piped numbers on top transform it from just dessert into a keepsake moment.
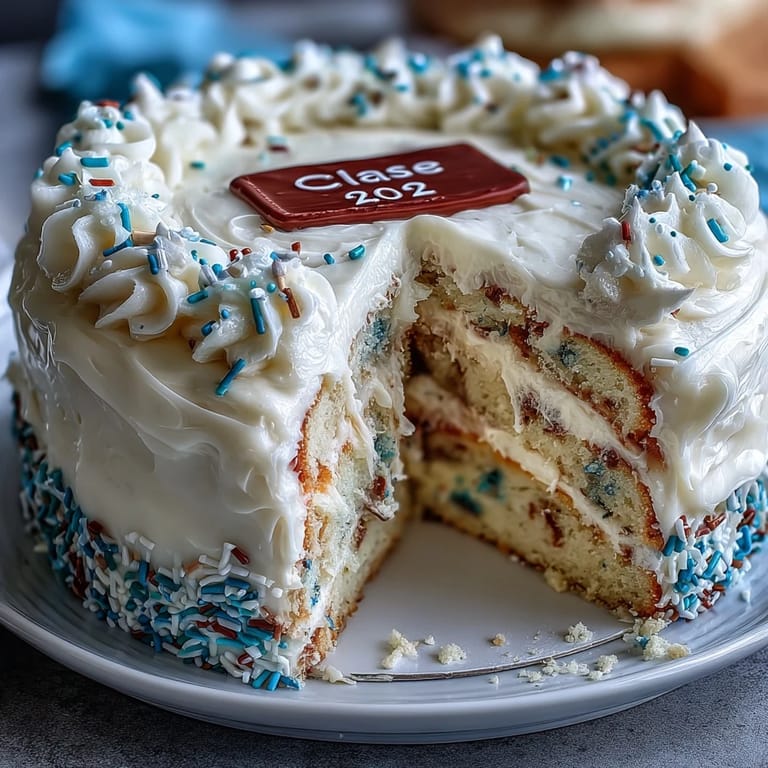
I'll never forget watching that cake get wheeled into the gymnasium on a metal cart, the Class of 2026 piping catching the light as parents craned their necks to see it. One of the kids asked if it was store-bought, and their mom laughed—not because it was pretentious homemade, but because it looked so clean and celebratory that it belonged at a real bakery. That's when I knew this recipe had done its job.
Ingredients
- All-purpose flour (2 ½ cups): This is your cake's foundation, and measuring by weight rather than volume keeps things consistent across batches.
- Baking powder (2 ½ tsp): Don't skip checking the expiration date—stale leavening is the silent killer of flat cakes.
- Salt (½ tsp): A pinch of salt deepens vanilla flavor in ways that seem like magic.
- Unsalted butter (1 cup), softened: Room temperature butter creams properly and gives you that tender crumb everyone wants.
- Granulated sugar (1 ¾ cups): Sugar does more than sweeten—it helps structure the cake and keep it moist.
- Large eggs (4), room temperature: Cold eggs won't incorporate smoothly, so pull them out while you're mixing dry ingredients.
- Vanilla extract (1 tbsp): Use real vanilla if your budget allows; it makes a noticeable difference in flavor depth.
- Whole milk (1 cup), room temperature: The alternating wet-dry method creates a tender crumb, and milk temperature matters more than you'd think.
- Unsalted butter (1 cup) for frosting: Same softness rule applies here—you're aiming for spreadable, not melted.
- Powdered sugar (4 cups), sifted: Sifting takes two minutes but eliminates lumps that ruin frosting texture.
- Whole milk (¼ cup) for frosting: This adjusts consistency so your frosting pipes like a dream.
- Vanilla extract (2 tsp) for frosting: A smaller amount here prevents the frosting from tasting overly vanilla-forward.
- Food coloring: Gel coloring gives brighter results than liquid, and a little goes a long way.
- Sprinkles or edible decorations: These are your chance to tie in school colors and make the cake visually pop.
Tired of Takeout? 🥡
Get 10 meals you can make faster than delivery arrives. Seriously.
One email. No spam. Unsubscribe anytime.
Instructions
- Get Your Setup Ready:
- Preheat that oven to 350°F and take a moment to grease your 9x13-inch pan properly—I use butter and parchment paper so the cake slides out without argument. Room temperature is also when you should pull out your eggs and milk, because cold ingredients mixing with warm butter is how you end up with a grainy, separated batter.
- Build Your Dry Mix:
- Whisk flour, baking powder, and salt together in a medium bowl—this distributes the leavening evenly so you won't get dense pockets. Set it aside and try to resist the urge to taste it.
- Cream Butter and Sugar:
- In your large bowl, beat softened butter with sugar for about three minutes until it looks pale and fluffy, almost like thick frosting. You're essentially aerating the batter at this point, so take your time and don't rush this step.
- Add Eggs One at a Time:
- Drop in one egg, beat until it's fully incorporated, then add the next—don't dump them all in at once or you'll have a curdled-looking mess. After all four are in, mix in your vanilla extract and beat for another minute.
- Alternate Wet and Dry:
- Add your flour mixture in three additions, alternating with the milk, and always start and end with flour—this method prevents overmixing and keeps the crumb tender. Mix just until you don't see dry streaks of flour; once you do, stop immediately.
- Bake the Cake:
- Pour the batter into your pan and smooth the top gently with a spatula, then bake for 30–35 minutes until a toothpick comes out clean or with just a few crumbs clinging to it. Cool the whole pan on a wire rack—don't try to flip it out while it's warm or you risk disaster.
- Make Your Frosting:
- Beat softened butter until it's creamy, then gradually add sifted powdered sugar so you don't create a flour cloud in your kitchen. Add milk, vanilla, and salt, then beat for 3–5 minutes until it's fluffy and spreadable, not dense or gritty.
- Frost and Decorate:
- Spread an even layer of buttercream over the cooled cake using an offset spatula or the back of a spoon, then divide remaining frosting into bowls and tint with food coloring. Pipe Class of 2026 with a small round tip, add sprinkles if you like, and step back to admire your handiwork.
 Save to Pinterest
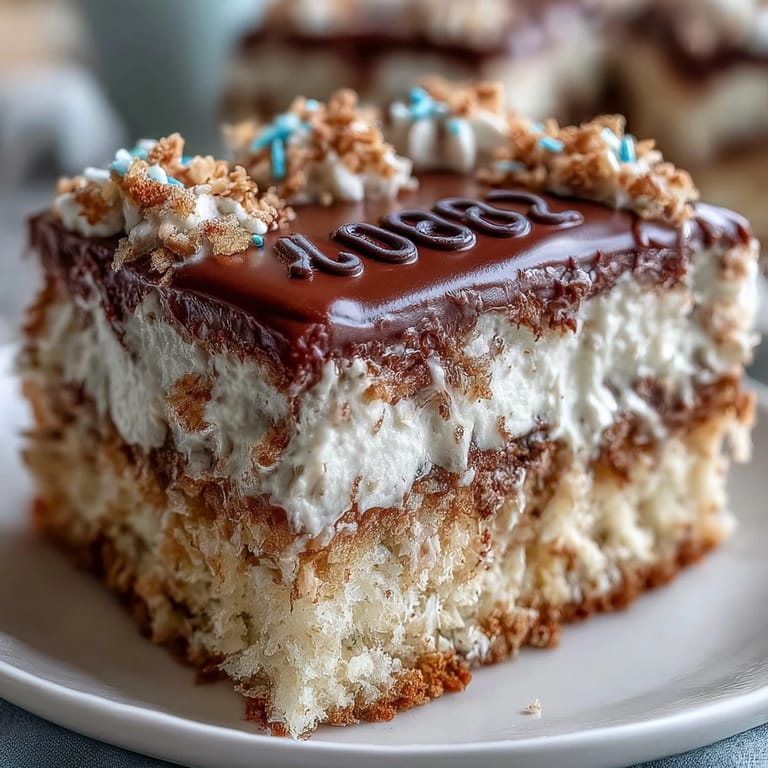
 The moment I piped that Class of 2026 onto the cake for the first time, something clicked—I realized that this wasn't just a recipe, it was a time capsule. Ten years from now, someone's going to see a photo of this cake and remember exactly where they were, who they were celebrating, and that specific vanilla smell in the kitchen the day before.
Why Sheet Cakes Are Secretly Genius
Sheet cakes don't get the glamour of layered cakes, but they're the workhorse of celebrations for good reason. You get more servings, they bake faster, they're easier to transport, and nobody's disappointed about size or presentation—they're just happy cake exists. Plus, a 9x13-inch pan is standard in most kitchens, so there's zero special equipment involved.
Frosting Consistency is Everything
I learned this the hard way when I once tried to pipe frosting that was too soft, and it just melted into blobs that looked more abstract art than celebratory numbers. Now I keep mine in the fridge if needed and always test the consistency by piping a practice squiggle on parchment paper first. Think of it like checking your oven temperature before baking—small moment of prevention saves you from cake regret.
Making This Cake Your Own
The beauty of this recipe is how much room it gives you to personalize without changing what makes it work. You could swap almond extract into the batter for subtle depth, use your school's colors throughout, or add a quote or design underneath the class year. The vanilla base is neutral enough that you're never fighting against the cake—you're building on it.
- Add ½ tsp almond extract to the batter if you want a sophisticated flavor twist.
- Make the frosting the night before and store it covered in the fridge, then let it soften at room temperature before piping.
- If you're decorating for multiple occasions, bake the cake unfrosted and freeze it for up to two weeks—frosting fresh right before serving keeps everything looking pristine.
 Save to Pinterest
 Graduation cakes are really just love with buttercream on top, and this recipe lets you show up for people when they're celebrating something big. Bake this one, pipe those numbers, and know you're doing something that matters.
Recipe Q&A
- → What flour works best for this cake?
All-purpose flour provides the right structure and tenderness for a moist, fluffy sheet.
- → How can I ensure the buttercream is smooth?
Beat softened butter thoroughly before gradually adding powdered sugar and milk to achieve a creamy, fluffy texture.
- → Can I customize the piping colors?
Yes, use food coloring to tint portions of buttercream to match desired school or party colors.
- → What is the ideal baking temperature and time?
Bake at 350°F (175°C) for 30 to 35 minutes, until a toothpick inserted in the center comes out clean.
- → How should I store the cake to keep it fresh?
Keep covered at room temperature up to 2 days, or refrigerate for up to 5 days to maintain freshness.