Save to Pinterest
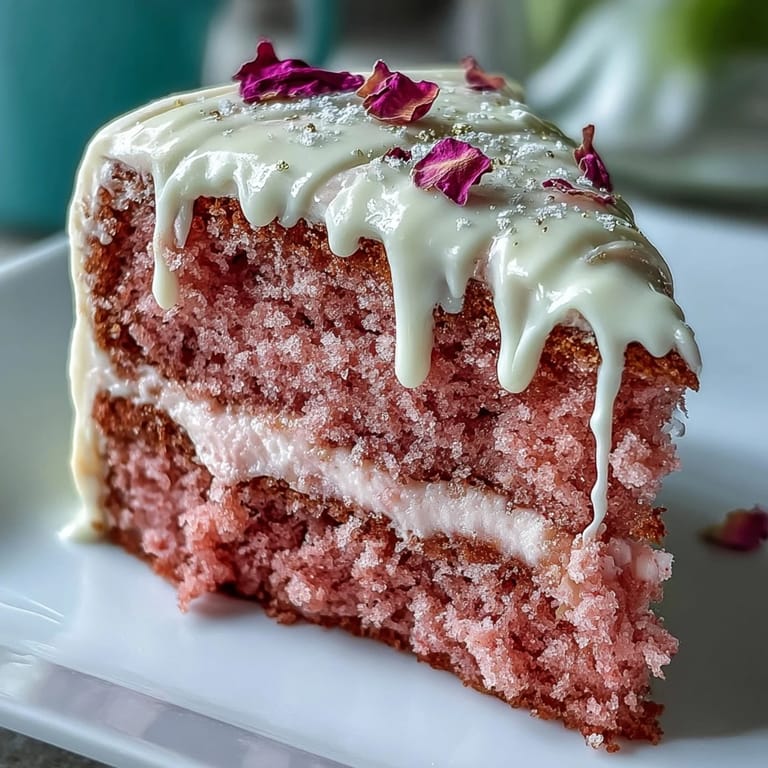
 The first time I made this Rosé Velvet Cake, I remember my kitchen shimmering with anticipation—literally. Pink-streaked batter swirled through my mixing bowl, the gentle, aromatic wisp of rosé nuzzling up to clouds of sugar as if this were an ordinary Tuesday, not the prelude to a bridal shower surprise. It was the kind of recipe that made me start humming halfway through, the unpredictably happy kind. My oven, which usually takes its time, seemed to sense urgency; every moment felt special, even before the gold drip touched the cake. Sometimes, a dessert just feels celebratory even before the first bite.
Gathering friends around my kitchen counter, we became a little impromptu bakery brigade: me on the mixer, someone sneaking tastes of the tangy frosting, one friend tracing her fingertip along a gold drip in total awe. It was noisy, sugary, and a little messy—the laughter spiked every time a brush of gold turned our fingertips royal. Looking back, the cake wasn't just a centerpiece, it was a conversation starter, a few glorious hours spent together with pink cheeks and sparkling eyes.
Ingredients
- Cake flour: Using cake flour gives the layers that extra level of tenderness that all velvet cakes need; be sure to sift for a truly airy crumb.
- Granulated sugar: I found that using just the right amount yields subtle sweetness and helps the pink hue shine through.
- Baking powder & baking soda: These ensure a lofty rise; double-check they're fresh for a perfect crumb.
- Salt: Even a small pinch brightens all the other flavors without drawing attention to itself.
- Unsalted butter: Let your butter come to room temperature—this is non-negotiable for effortless creaming.
- Vegetable oil: The secret ingredient for lingering moisture, even on day two of leftovers.
- Large eggs: Room temperature eggs blend more smoothly and create a velvety batter.
- Rosé wine: Pick a still rosé that smells delightful to you; its floral notes will quietly infuse the sponge.
- Vanilla extract: Choose pure vanilla if possible—it's worth it here, as the flavor peaks through in every bite.
- White vinegar: Just a splash keeps the crumb light and balances the sweetness.
- Pink gel food coloring: Use sparingly; one drop at a time creates the sunset blush without overwhelming the palate.
- Cream cheese: I always double-check for soft, full-fat cheese—any compromise here and the frosting can go grainy.
- Powdered sugar: Sifting is essential; lumps have no place in our cloud-like frosting.
- Heavy cream: Needed for that glossy, smooth consistency in the drip, just gently heated until it whispers steam.
- White chocolate: Chop it finely for quick, even melting without scorching.
- Edible gold luster dust & vodka/lemon extract: Mix to ‘paint’ and remember to use a clean, food-safe brush for showstopping gold accents.
Tired of Takeout? 🥡
Get 10 meals you can make faster than delivery arrives. Seriously.
One email. No spam. Unsubscribe anytime.
Instructions
- Get Ready:
- Preheat your oven to 350°F (175°C), grease and line your three cake pans with parchment, and cue up your favorite playlist.
- Mix Dry Ingredients:
- Whisk cake flour, baking powder, baking soda, and salt together until you can't see a trace of white from the soda.
- Cream Butter and Sugar:
- In another bowl, beat softened butter, oil, and sugar until the mixture is pale and fluffy, about three minutes—it should look lighter and almost billowy.
- Incorporate Eggs and Flavor:
- Add eggs one by one, beating well after each, then stir in your vanilla and vinegar until it's all silky.
- Build the Batter:
- Alternate adding the dry mixture and rosé wine in batches, gently folding after each addition; if you're using food coloring, swirl it in now, just until you love the color.
- Bake:
- Divide the batter into your pans, smooth the tops, and bake until a toothpick comes out clean (about 30-35 minutes); the aroma is how you'll know it's done.
- Cool Completely:
- Let cakes rest in their pans for 10 minutes, then turn out onto racks—resist the urge to frost before they're totally cool.
- Frosting Time:
- Beat cream cheese and butter together until smooth, sift in powdered sugar gradually, then beat in vanilla and a pinch of salt; cool the frosting if needed to firm it up for spreading.
- Layer and Frost:
- Level the cooled cakes if needed, place the first layer—spread a generous swoosh of frosting, then repeat for the remaining layers and coat the whole cake in velvety cream cheese.
- Gold Drip Drama:
- Gently heat cream and pour it over chopped white chocolate, then whisk until glossy and smooth; let it cool slightly before dripping over cake edges for that signature drape.
- Paint it Gold:
- Mix gold dust with vodka or lemon extract into a dreamy paint, then use a food-safe brush to highlight the drips once set for instant magic.
 Save to Pinterest
 At the end of one sparkling afternoon, as the last gold-flecked slice disappeared from its platter, I realized this cake didn&apost just celebrate an engagement—it sealed friendships and started stories. People still talk about it as the moment that made the party feel extra golden.
How to Make Your Cake Drip Picture-Perfect
I learned that drips work best if the cake is really well-chilled—that way, the warm chocolate doesn't blur into rivulets but settles into sleek, camera-ready stripes. Use a spoon to guide the drip; I let the chocolate puddle on the top for a dramatic look before gently nudging some over the edge. Working quickly keeps the look clean, and if you mess up, you can carefully scrape off a drip and try again before the chocolate sets.
Choosing the Best Rosé
A floral, fruit-forward rosé is my go-to, since the subtle notes bloom once baked; avoid anything sparkling, as the bubbles vanish in the oven and can make the texture unpredictable. If you taste the wine and like it on its own, you'll love it in cake. Don't overthink brands—just choose something you'd enjoy sipping with friends.
Decorating with Gold: Lessons from My First Attempt
The first time I tried the gold drip, I used too much liquid with the luster dust, and the paint streaked; a concentrated mixture gives you a shimmery finish with fewer brush marks. Let each drip harden before painting or the color blurs. The gold is magical, but edible flowers or fresh berries also look stunning if you want to switch things up.
- Clean your brush thoroughly each time you dip into the gold paint for crisp lines.
- Work in a well-lit area so you don't miss any hidden spots for painting.
- Always check that your luster dust is labeled food-grade and safe for your guests.
 Save to Pinterest
 No matter how many fancy decorations you add, there's genuine warmth in sharing a slice of cake you made by hand. May this Rosé Velvet bring a bit of celebration to your own kitchen, golden moments and all.
Recipe Q&A
- → Can I make this without alcohol?
Yes. Substitute equal parts pink grape juice plus a splash of lemon juice for the rosé to retain color and a touch of acidity while keeping the wine flavor profile absent.
- → How do I get an even pink hue?
Use gel food coloring for a more concentrated color without altering batter consistency. Add a small amount after combining wet and dry ingredients and adjust until you reach the desired shade.
- → What’s the best way to level and stack the layers?
Cool cakes completely, then trim domes with a serrated knife or cake leveler. Place the first layer on a turntable, apply an even layer of frosting, repeat, and chill briefly before crumb-coating and final frosting.
- → How do I make a smooth cream cheese frosting?
Beat softened cream cheese and butter until silky, then add sifted powdered sugar gradually. Keep mixing on low once sugar is incorporated to avoid graininess and chill if the frosting becomes too soft to spread.
- → Tips for a clean gold drip finish?
Chill the frosted cake so the drip sets quickly. Warm the white-chocolate ganache until pourable but not hot, test drips on the side, then paint with edible gold luster mixed into vodka or lemon extract for a stable metallic finish.
- → How should I store the finished cake?
Refrigerate the cake in an airtight container or under a cake dome. Remove from the fridge about 30–60 minutes before serving to soften the frosting and return flavors to their best.